The Science Print Service has a simple and easy operation, based on charges associated with the current student card ("CGD card") in the case of students. Teachers and Staff do not need to carry out fundings.
The system allows self-service copies to be made. Any employee or student card gives access to one of the available equipment, allowing the user to make copies with various characteristics (black and white, color, duplex, change quality and number of copies, etc.) through the available choices on the touch screen of the device interface. It is also possible to make prints, with the print only actually being printed when the user goes to one of the available Mutifunctional equipments and identifies himself. Finally, it is also possible to carry out scans, at no cost to the user, with the result being sent by email in PDF or image (the choice is up to the user in the equipment interface).
How to use
Authentication on equipment
To perform any of the three functions (Copy, Print and Scan) the user must be identified with the equipment. There are two ways to carry out this identification:
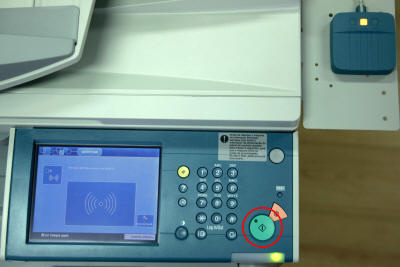
- Swipe the card through the equipment's proximity reader. The Science access card must be placed near the indicated reader to log in and log out at the end of the session. Depending on the equipment, the player may vary slightly in location and format.
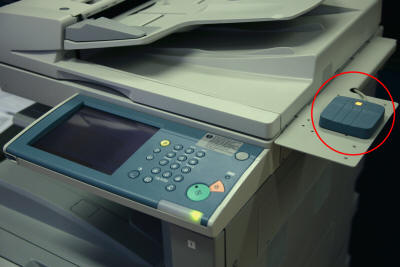
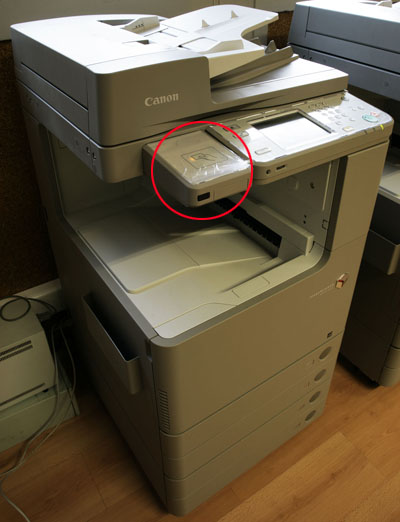
- Alternatively, the user can also log in on the equipment's touch screen with their account, using only their username (ie omitting the @fc.ul.pt or @alunos.fc.ul.pt component)
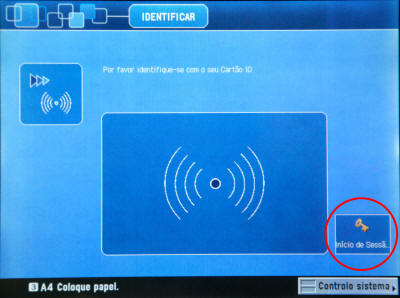
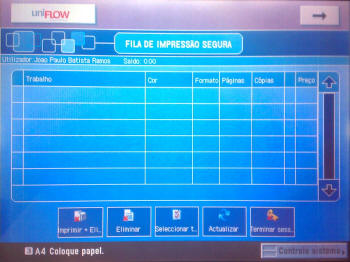
To print, just send the documents to the printer "Sistema de Impressão FCUL". This printer appears automatically configured on the lab computers and can be added to the teachers' personal computers. Documents are actually printed on the equipment chosen by the user after authentication and selection of documents to be printed. Even after sending, if you do not want to print, just delete the jobs displayed on the devices screen. In the case of students, only the sheets actually printed are paid. For Teachers and Staff the use is identical, with no need to charge, using the Science card or the @fc.ul.pt user account.
Detailed instructions
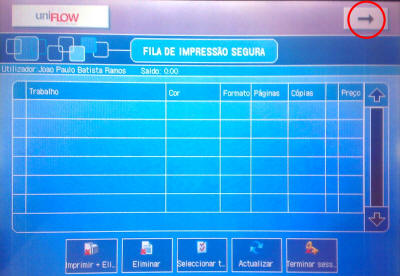
After authentication, click on the "arrow" in the upper right corner of the screen (the main screen is always the print list, associated with the user's account). By clicking on this button the user will have access to other options.
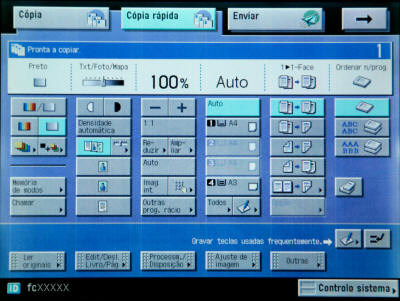
The screen shown (see below) has several options at the top. By default it will already be in the "Copy" screen.
On some machines an intermediate menu appears asking for the desired option:
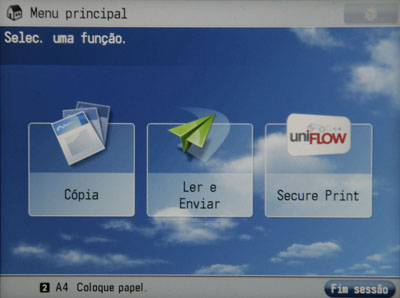
In these devices, you must press the "Home" button to return to this menu.
Main Functions
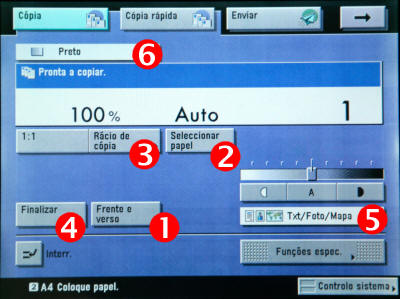
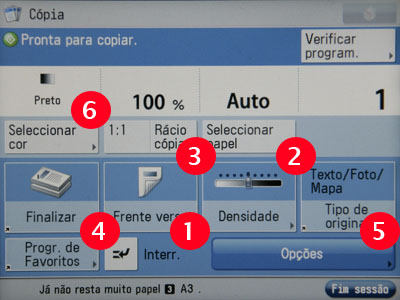
- Front and back: selecting this function, several possibilities arise; ex: F/V original to F/V copy. We chose the desired one, bearing in mind that the symbols on the left of the arrow represent the originals, on the right will be the work produced.
- Paper selection: Despite being automatic, it is also possible to program manually, namely by-pass programming, where non-standardized copy/print supports are inserted, such as cardboard and transparencies.
- Enlargement/Reduction: In this function, the user can choose fixed scales to enlarge/reduce the original, eg A4-A3 and A3-A4, or do it manually.
- Finishing: This item allows (with options) a more professional finish. In the base configuration, it allows the separation of sets in a cross shape.
- Quality: By default it is in Text mode, Photo, Map and Text/Photo modes can be selected
- Color Copy: By default the machines copy/print in Black and White, when copying, using the function on the top left of the display, you can change from Black and White to Color.
Secondary Functions
Special functions SUB-MENU 1
- Flyer
- Choose original format
- Set copy format (choice of paper feed between drawers and bypass)
- Giving "OK" ends the programming
Additional Notes:
- You can also add cover
- Choose printed or unprinted covers
- Define cover paper type
Recommendations:
- Use A4 originals format
- A3 booklet format (direct copy)
- A4R booklet format (select by-pass if there is no cassette with this format)
- Different Size Originals: Allows simultaneous reading of sets with different size originals; ex: A3 and A4.
- Cover / Sheet Insertion
- Allows the user to place covers/back covers and chapters/sheets in sets
- From the 3 options shown, on the display, select the ones you want to run
- Set the copy paper source for each of the options
- Define, in each of the options, whether to leave it blank (best choice in demo) or which side you want to see printed.
- Select the placement of chapters/sheets. Choose to add, then with the machine keyboard, indicate the front of the sheet where you want the chapter to be inserted.
- Repeat this operation depending on the number of chapters you want to insert.
- Separation and Transparencies
- Important: Transparencies must be placed in the bypass tray.
- Define the transparency format.
- Choose whether you want the slip sheet printed or not
- Select where to place slip sheets (which drawer)
- Continuous copy of jobs / Job build: Allows the reading of sets with a number of sheets greater than the capacity of DADF - Just activate. Place the originals in the feeder, dividing them into several tranches, using the green key to take the readings. After all originals have been scanned, press the done key.
- Image combination
- Selecting the format of the originals
- Choose the combination mode; ex. 2 in 1, 4 in 1, etc.
- Choose whether or not to enable double-sided copying and under "option" key you can select the order of images.
- Indicate the copy format.
Notes:
- In this function, moving to the center is automatically activated. Please note that the cameras may not have the "picture separation" function.
- Work completed notice ( Job done notification )
- Activate the function
- Select the predefined e-mail address where you want to send the notice of work done.
- Shift function
- Active shift function
- Use the arrows to choose in which direction you want to move the original
You can also define coordinates, using the measures (millimeters). This function only works with originals smaller than the copy size
- Margin function: Allows you to define the size of the margin to be created in millimeters. This function is useful for file punching.
- Margin Function: Elimination of black spots due to light entering the exposure glass.
Special functions SUB-MENU 2
- Negative/Positive Function
- Composition of Forms: you may need to pre-program the form to be used
- Previous programming of the form
- Select star key
- common schedules
- In menu 3 of 6 select the option "Register form for composition"
- Activate register
- Select original format
- Choose between full image and transparent image
- This option is made depending on the gradient that your form will have.
- Give the form a name so you can easily identify it
- Press the green key to scan and save your form
- Form Usage
- Select form composition
- Choose the place where you want the form to be printed
- Choose which form to use (from the list shown)
- Click OK
- Mode Memory: Allows you to memorize up to 9 jobs that are regularly performed on the equipment. Note: Useful demo function, preparing in advance the programming of two or three jobs.
- Image repetition: Allows you to repeat in two axes the same image several times, on a single sheet. Note: For full filling it is advisable to use the "auto" , when choosing the quantity. Set the original size to the format closest to the hypotheses presented.
- Page numbering or copy sets
- page numbering
- Select the desired option in the left corner
- With the keys select the position where the number will be on the sheet
- Skip the next menu
- Select size and color of number
- Numbering of copy sets
- Use the keys to select the desired print position
- Set the number size and color density
- page numbering
- Watermark/Date imprint
- Watermark
- Use the arrows to choose the print position
- Set in "print type" whether you want on all pages or just at the top of the first
- Choose one of the previously programmed brands or customize a new one by creating
- Select the size and whether you want it transparent or overlaid
- Print date
- Use the arrows to choose which position you want it to be
- Specify what date you want
- Specify which date format you want (eg day/month/year)
- Choose the size and whether you want transparent or superimposed date
- Watermark
- Call function: Allows access to the last three jobs performed on the machine
- reflected image
- Sharpness: choose whether you want to increase the sharpness level of copies performed on the machine
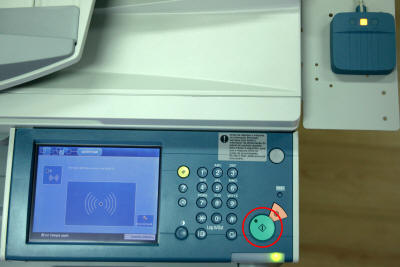
To start scanning (as well as copying) you must press the green button on the device, next to the touchscreen.
Scanning
Scanning is done by selecting the appropriate option on the touch screen after authentication and allows you to select the e-mail addresses for the documents' destination. The "Send to me" button allows you to send the file to the user's email account. Scans (A4 PB and Color and A3 PB and Color) are not subject to the existence of a balance on the card.
Detailed instructions
After authentication, click on the "arrow" in the upper right corner of the screen (the main screen is always the print list, associated with the user's account). By clicking on this button the user will have access to other options.
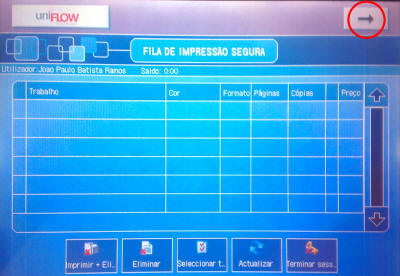
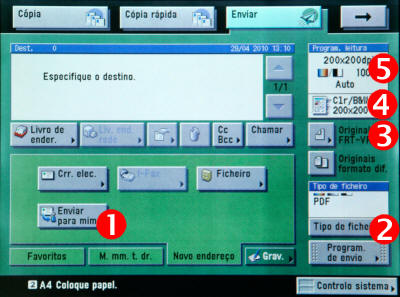
In some equipment, a menu with three options should appear, one of them being "Read and Send". On other devices, such as on the screen shown below, you may see several options at the top. Choose the "Send" option.
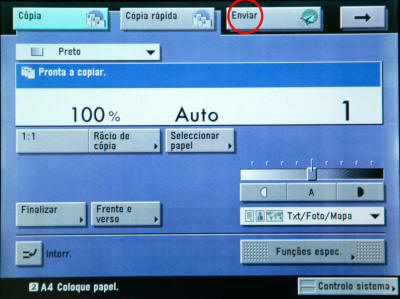
On this screen a document (with one or more pages, single-sided or two-sided, in color or black and white) can be scanned.
The document is sent as an attachment in an email message, which you can configure (document name, subject, text in the message body) however these changes are neither necessary nor mandatory.
In the center of the screen there is a button that facilitates sending: "Send to me" (1). This button automatically fills in the recipient field of the email message with the address associated with the user account identified with the device.
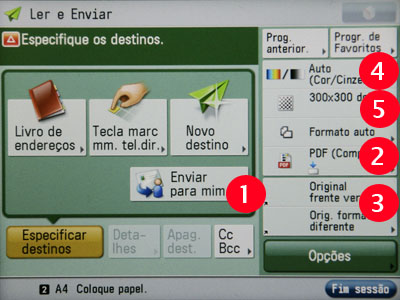
The scanned document can be sent as a JPEG, TIFF or PDF file. Choice (2) can be made by the user before scanning. Other options like duplex (3), b/w or color (4) and scan quality (5) can also be chosen on this screen.
Or on some devices on a screen similar to the following:
To start scanning (as well as copying) you must press the green button on the device, next to the touchscreen.
The use of the equipment as a scanner must be carried out with common sense and without occupying the equipment for more than 5 minutes in a row.
Costs
Scans are free of charge. Prints and copies have the following cost:
| Simple | Front and back | ||
|---|---|---|---|
| A4 | B/W | 0.02 € | 0.04 € |
| Colors | €0.20 | €0.40 | |
| A3 | B/W | €0.08 | €0.16 |
| Colors | €0.80 | 1.60 € |
Prices include VAT at the legal rate in force.
The value of the prints will only be deducted at the time of printing, that is, when the student goes to the equipment after performing the print on the computer.
If you do not go to the equipment within 30 minutes, the prints will be automatically deleted and no amount will be deducted from the balance.
Funding your card and checking your balance
Charges are carried out at the Notario located in front of the security service in building C5 (underneath the televisions in the service system).
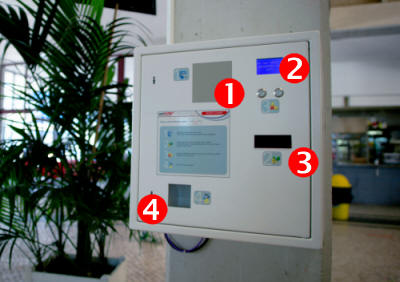
To carry out a charge, you must:
- Pass the card in front of the reader (1);
- Confirm your identification on the existing display (2);
- Put a note of 5 , 10 or 20 in the entry of notes (3);
- Remove the loading receipt (4). This document is not a receipt. If you wish to obtain a receipt, you must go to the General Science Service, treasury counter, 48 hours (useful) after the loading has been carried out.
The top up amount will be added to your current card balance. If you do not have any balance on your card, you will not be able to make Copies or Prints, but you will be able to carry out scans.
The Computer Center does not receive cash shipments at the Customer Service. In case of unavailability of the Notario, you can carry out shipments at the treasury counter of the General Science Service.
Balance and Movements Inquiry
The " Printing System " option on the Portal de Ciências personal page allows you to check the Balance and Movements associated with the card.
Equipment for General Use
| Equipment | Local |
|---|---|
| Canon iR-ADV C3530 | Student Area (Room 1.2.1) |
| Canon iR-ADV C3520 | Biology Library (Room 2.2.20) |
| Canon iR-ADV C3530 | C4 Library - (Room 4.2.10) |
| Canon iR-ADV C3530 | C4 Library - (Room 4.2.10) |
| Canon IRC1028 | Geology Library (Room 6.4.42) |
| Canon iR-ADV C3520 | DEGGE (Beside the security guard on C8 Floor 2) |
Available Equipment for Teachers, Staff and Researchers
| Local | Equipment |
|---|---|
| Student Area (Room 1.2.1) | Canon iR-ADV C3530 |
| Biology Library (Room 2.2.20) | Canon iR-ADV C3520 |
| DBV - Building C2 Floor 3 Corridor | Canon iR-ADV C3520 |
| DBA - Building C2 Floor 4 Corridor | Canon iR-ADV C3520 |
| C6 lobby at the foot of the elevator and the room (6.4.13) | Canon iR-ADV C3520 |
| C4 Library - (Room 4.2.10) | Canon iR-ADV C3530 |
| C4 Library - (Room 4.2.10) | Canon iR-ADV C3530 |
| At the foot of the elevator on the Geology floor on C6 Floor 3 | Canon iR-ADV C3520 |
| DI Lobby (Near Room 6.3.71) | Canon iR-ADV C3520 |
| Hallway of C8 Floor 1 | Canon iR-ADV C3520 |
| Academic Services Department (room 5.3.10) | Canon iR-ADV C3520 |
| Corridor of IDL C1 Floor 1 | Canon iR-ADV C3520 |
| Mathematics Library (Room 6.1.21) | Canon iR-ADV C2030i |
| Hallway near room 6.2.20 | Canon iR-ADV C3520 |
| Geology Library (Room 6.4.42) | Canon IRC1028 |
| Floor 4 ATRIUM DG - Geology | Canon iR-ADV C3520 |
| DEGGE (Together with security on C8 Floor 2) | Canon iR-ADV C3520 |
| Several (Corridor of C8 Floor 3) | Canon iR-ADV C3520 |
| Department of Physics (Corridor C8 Floor 6 on the right) | Canon iR-ADV C3520 |
| Department of Chemistry (Corridor C8 Floor 6 on the left) | Canon iR-ADV C3520 |
| TIDE | Canon iR-ADV C3520 |
| C1 FLOOR 5 (Room 1.5.17) | Canon iR-ADV C3520 |
| C1 FLOOR 5 (Room 1.5.09) | Canon iR-ADV C3530 |
| C2 FLOOR 4 (Room 2.4.07) | Canon iR-ADV C3520 |
| C1 FLOOR 4 (Room 1.4.19) | Canon iR-ADV C3520 |
System Configuration on Laptops and Workstations
Note 1: If the driver is not compatible with your operating system, please download the correct driver from the following address . Driver for Windows is Canon iR-ADV C3520 PCL
Note 2: For laptops, you can use the Eduroam network (in Science) to print.
Windows operating system
Printer setup may need to be done every time the computer is turned on/restarted. To proceed with this configuration, follow the steps below:
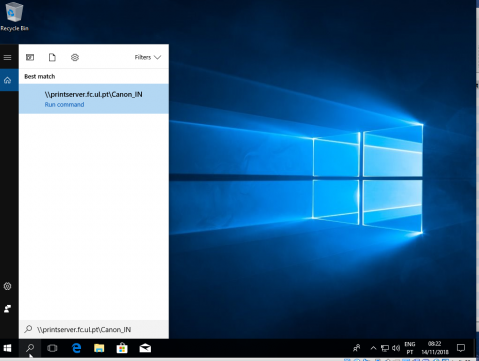
- Go to the "Start Menu" and write the \\printserver.fc.ul.pt\Canon_IN and press the "Enter" key.
- Fill in the authentication information (if requested) with your @fc.ul.pt or @alunos.fc.ul.pt domain password and click on "OK".
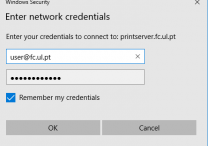
Attention: The value of the impressions will be deducted from the username you enter in this authentication. - The printer driver will be installed on your laptop or workstation.
- Finally, the printer will appear on your computer (in the "Printers and scanners" section).

Mac OS
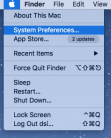
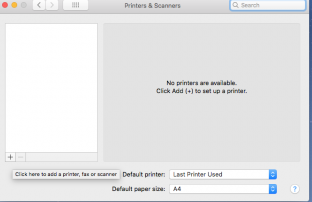
- Go to Apple and choose "System Preferences...".
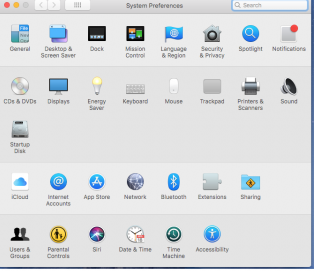
- Choose the option "Printers & Scanners".
- Click on add printer (+ symbol).
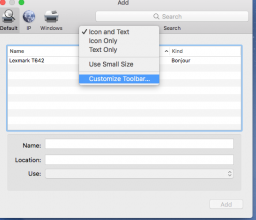
- Right-click (Ctrl + Click) on the options bar. Select "Customize Toolbar..."
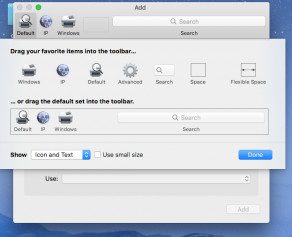
- Drag the "Advanced" symbol to the options bar. Select "Done".
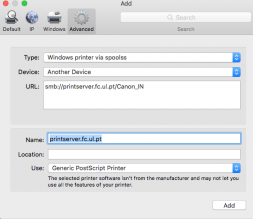
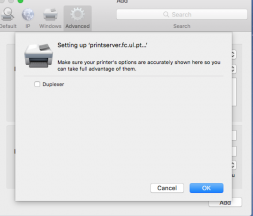
- Put the options as in the figure below. In the type select Windows printer via spoolss . In the URL put the address smb://printserver.fc.ul.pt/Canon_IN . In the "Use" field you must select Generic PCL Laser Printer for black and white printing and Generic PostScript for color printing . Finally, click on "Add".
If you cannot print and you are using a new MAC version like macOS Big Sur v11.0, you may need to download this updated driver here
Then choose the USE part - Software - Canon iR-ADV C3520 PS
- Select the "Duplexer" option if you want to be able to print "Duplex" and click on "OK".
- When printing, select printserver.fc.ul.pt (or the name you assigned).
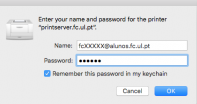
- When sending the job to the printserver, it asks you to enter the authentication information with your password from the domain @fc.ul.pt or @alunos.fc.ul.pt.
Attention: The value of the impressions will be deducted from the username you enter in this authentication.
Linux Ubuntu Operating System
1. Open the terminal.
2. Install the smbclient package:
sudo apt-get install smbclient
3. Click on "Activities", write in the search field "printers" and select the 1st result.

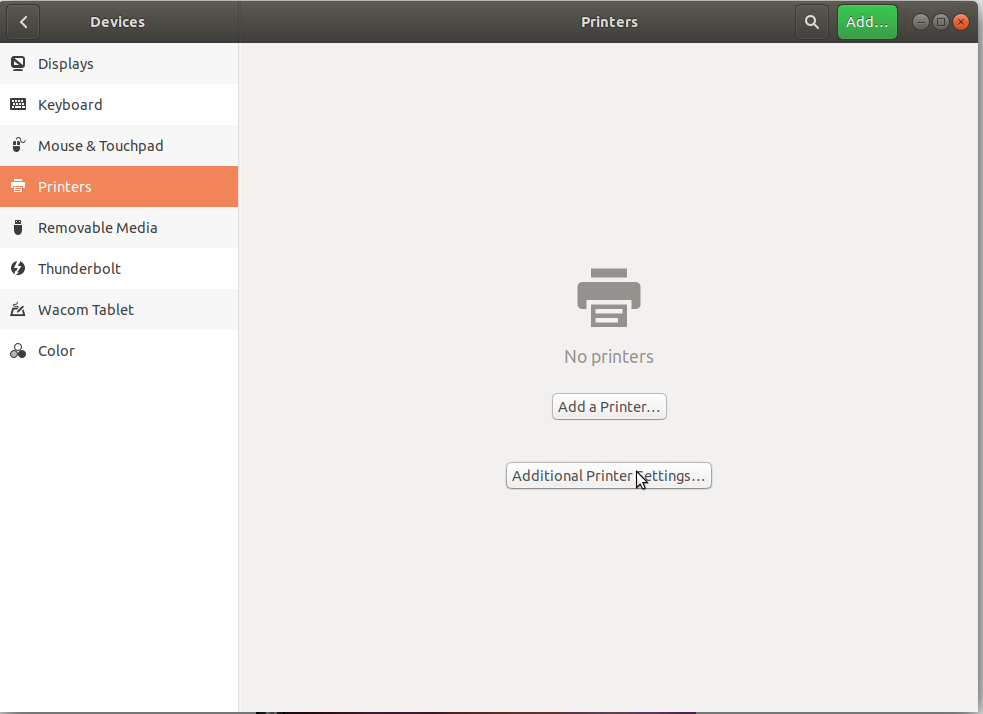
4. After opening the "Printers" window click on "Additional Printer Settings..."
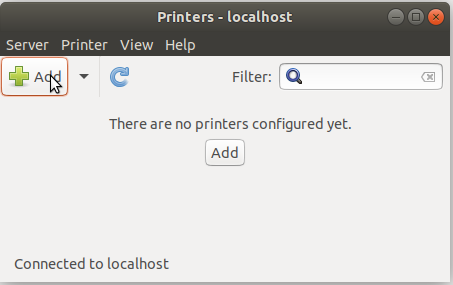
5. In the new window select the "Add" button in order to add a new printer.
6. In the new dialog window, open the item that says "Network Printer" and after that select "Windows Printer via SAMBA".
7. In the new options that appear on the right after the selection, enter in the text box preceded by "smb://" the following: "printserver.fc.ul.pt/Canon_IN".
8. Select the option "Set authentication details now" and enter your password and username. Finally select forward.
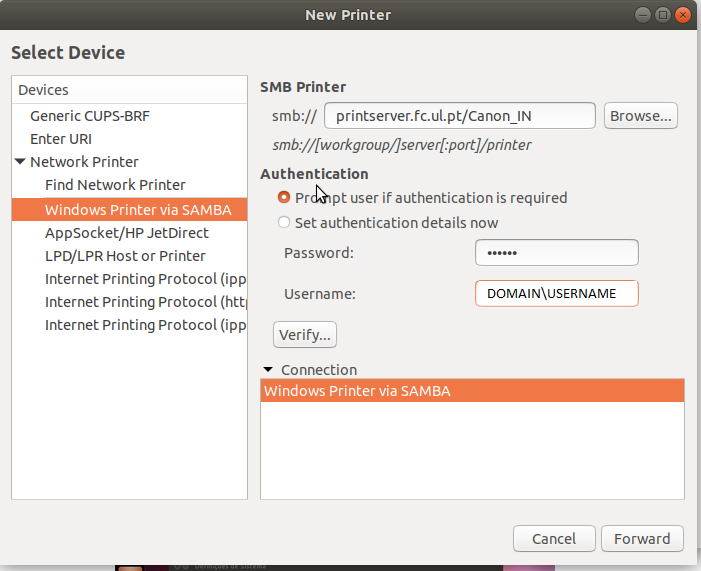
NOTE: You should replace DOMAIN\USERNAME with:
- Username: FC\o_your_username
- Student number: ALUNOSFC\o_your_username
Attention: The value of the impressions will be deducted from the username you enter in this authentication.
9. Wait while Ubuntu makes the list of drivers until the following window appears and select next with the first option from the list selected.
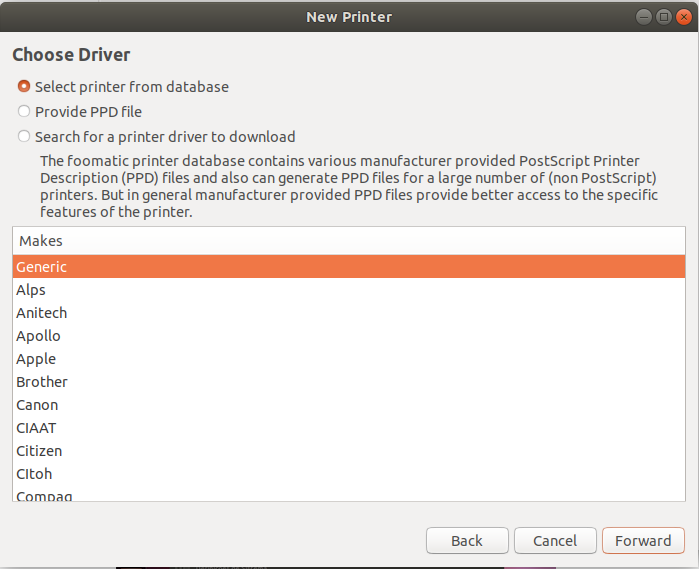
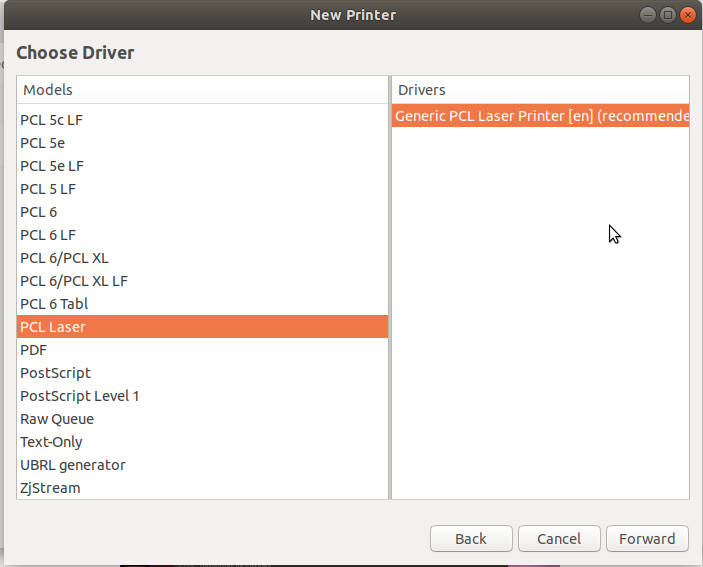
10. In this window select from the list on the left "PCL Laser" and on the right "Generic PCL Laser Printer [en]" for black and white printing or select "PostScript" on the left and right "Generic PostScript Printer [en]" for color print and select "Forward".
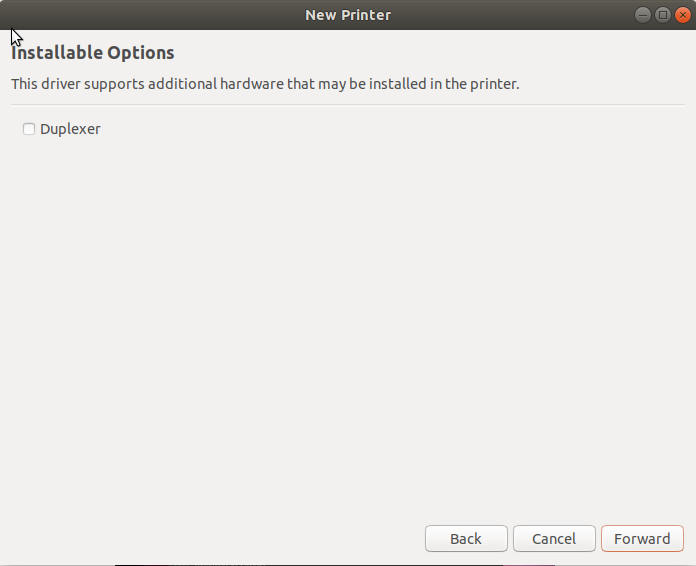
11. On this screen we have an item to select. If you select this item, the printer will print on both sides, otherwise, it will only print on one side. In case you want both options available, after finishing this tutorial, repeat the same with the opposite option to the selected one.
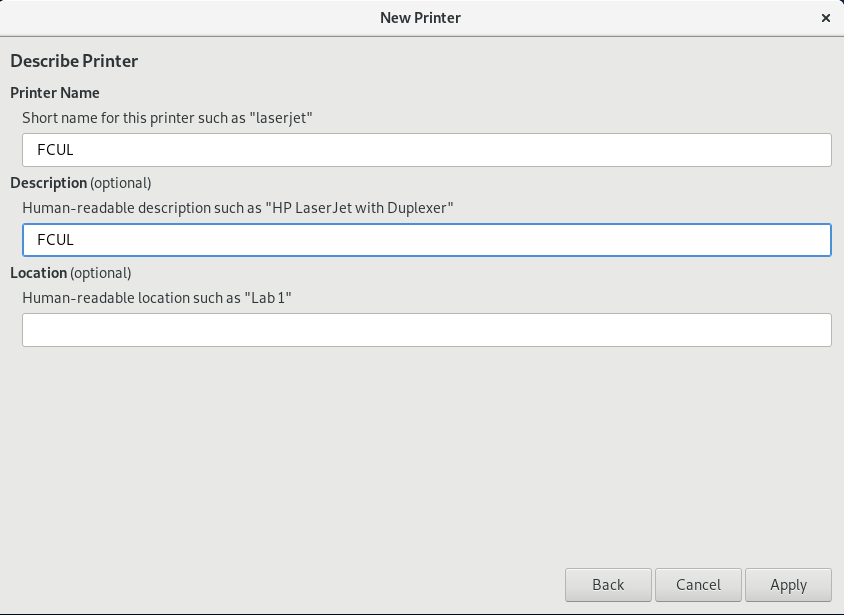
12. Finally, just give the printer a name, description and location by clicking next to finish.
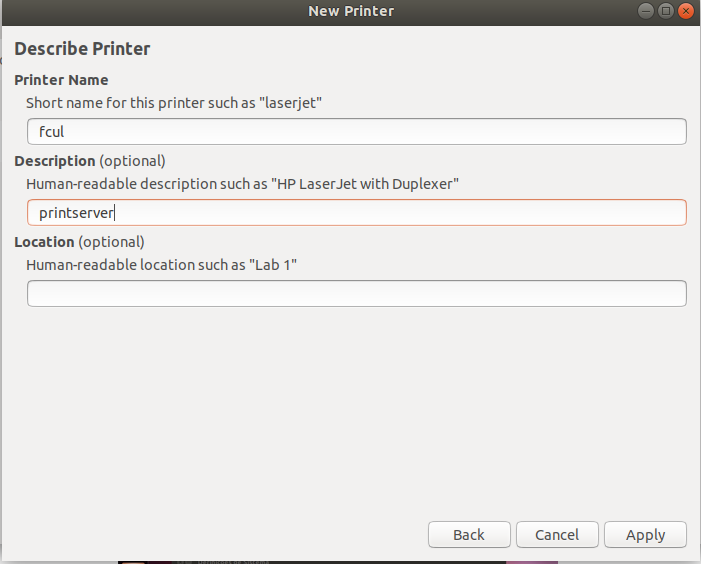
If after doing this everything cannot print, do this:
sudo apt install cups-pk-helper
And test again.
Linux Fedora Operating System
1. Open the terminal.
2. Install the following packages:
yum install samba-client system-config-printer python3-smbc
3. Open the printer configurator by placing the following command in the terminal:
system-config-printer
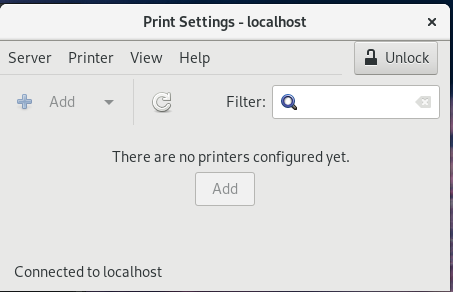
4. Click "Unlock", then click "Add".
5. In the new dialog window, open the item that says "Network Printer" and after that select "Windows Printer via SAMBA".
6. In the new options that appear on the right after the selection, enter in the text box preceded by "smb://" the following: "printserver.fc.ul.pt/Canon_IN".
7. Select the option "Set authentication details now" and enter your password and username. Finally select "Forward".
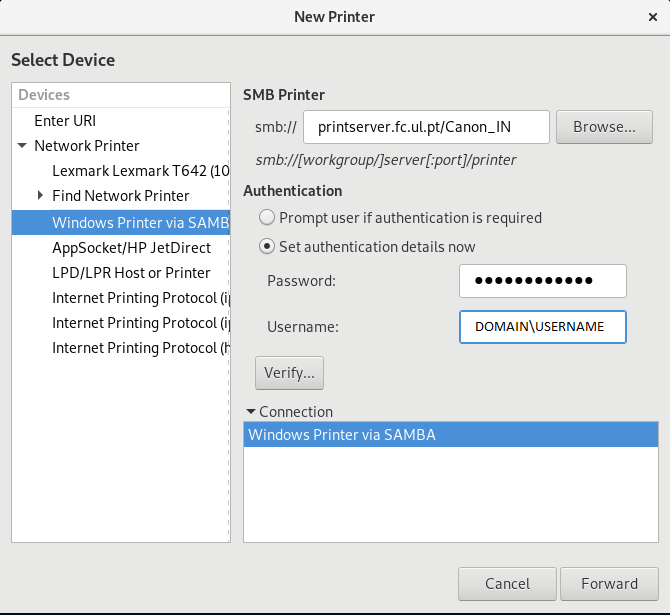
NOTE: You should replace DOMAIN\USERNAME with:
- Username: FC\o_your_username
- Student number: ALUNOSFC\o_your_username
Attention: The value of the impressions will be deducted from the username you enter in this authentication.
9. Wait while Ubuntu makes the list of drivers until the following window appears and select next with the first option from the list selected.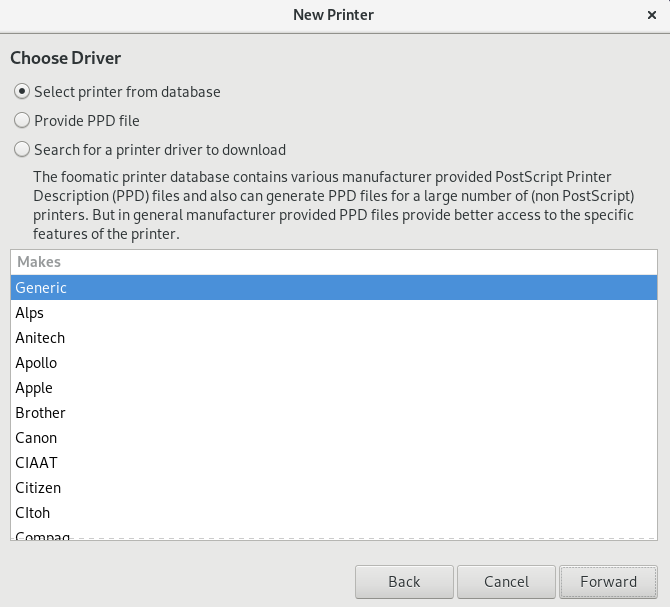
10. In this window select from the list on the left "PCL Laser" and on the right "Generic PCL Laser Printer [en]" for black and white printing or select "PostScript" on the left and right "Generic PostScript Printer [en]" for color print and select next.
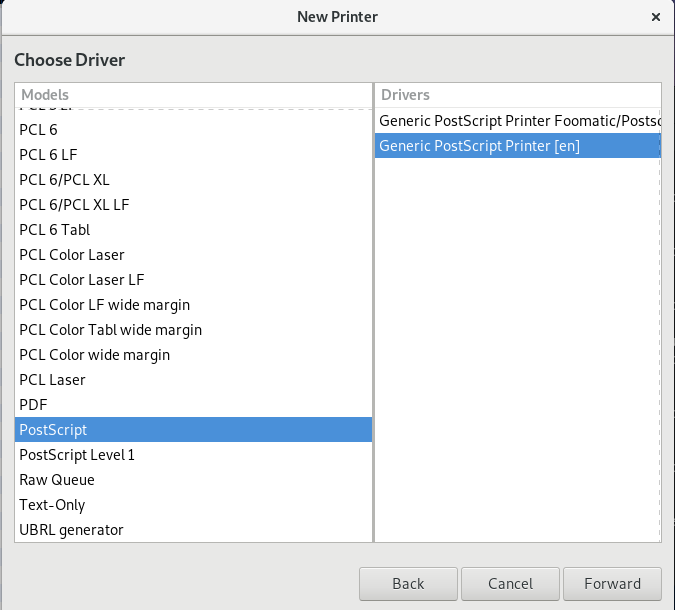
11. On this screen we have an item to select. If you select this item, the printer will print on both sides, otherwise, it will only print on one side. In case you want both options available, after finishing this tutorial, repeat the same with the opposite option to the selected one.
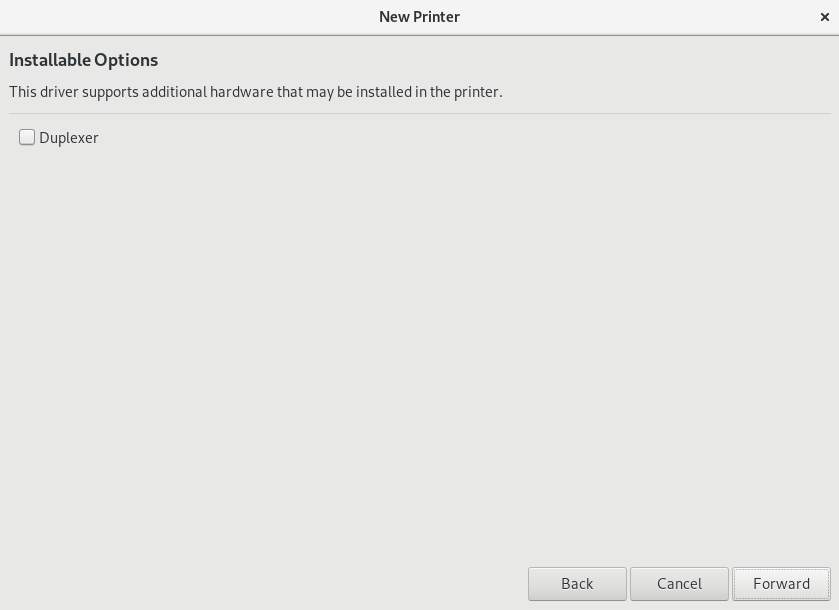
12. Finally, just give the printer a name, description and location by clicking next to finish.
Private Instructions for Staff and Teachers
Use of DBA / DBV printers with associated cost centers
There are 2 printers located in the corridors of Floors 3 and 4 of Building C2 which are configured to serve only the employees/scholarship holders/Teachers of the departments and cost centers of the DBA and DBV. The way to use these printers is similar to other printers in the FCUL printing system, with the exception of the following steps:
- Swipe the card into the card reader or press "AD Login" and enter your username and password
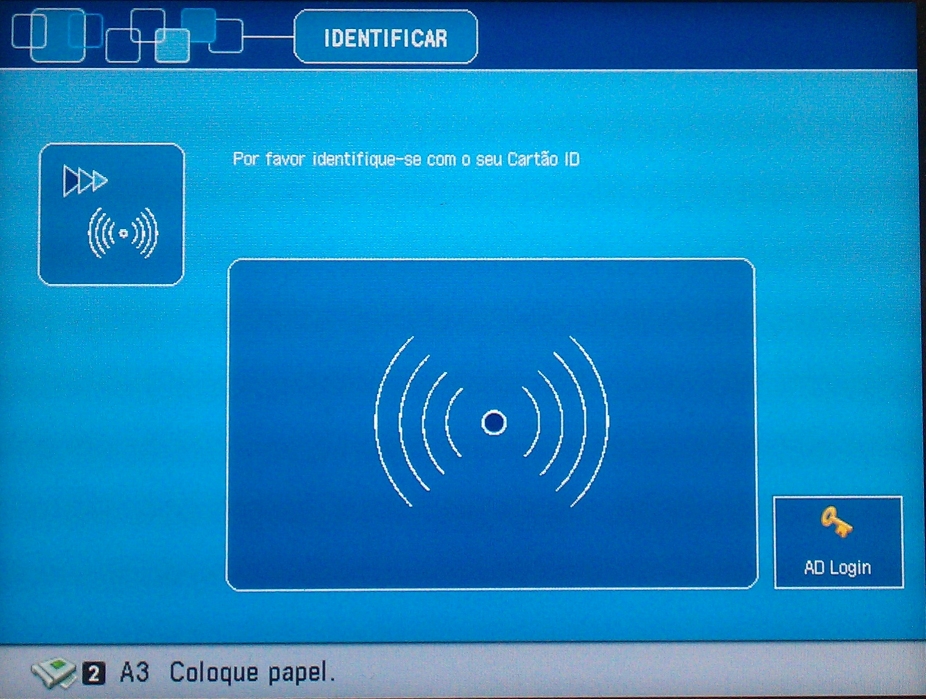
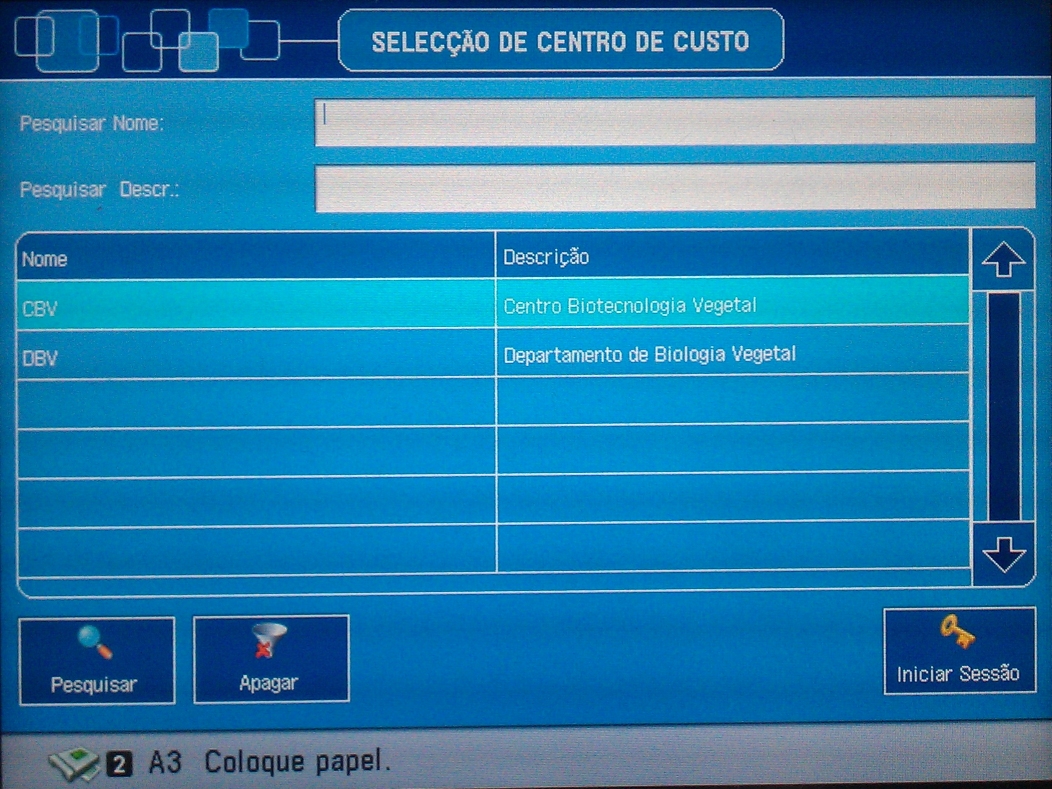
- After logging in to the printer, if the user (employee/scholarship/professor) has more than one associated cost center, a screen will appear where he/she must choose the cost center and click “Login”
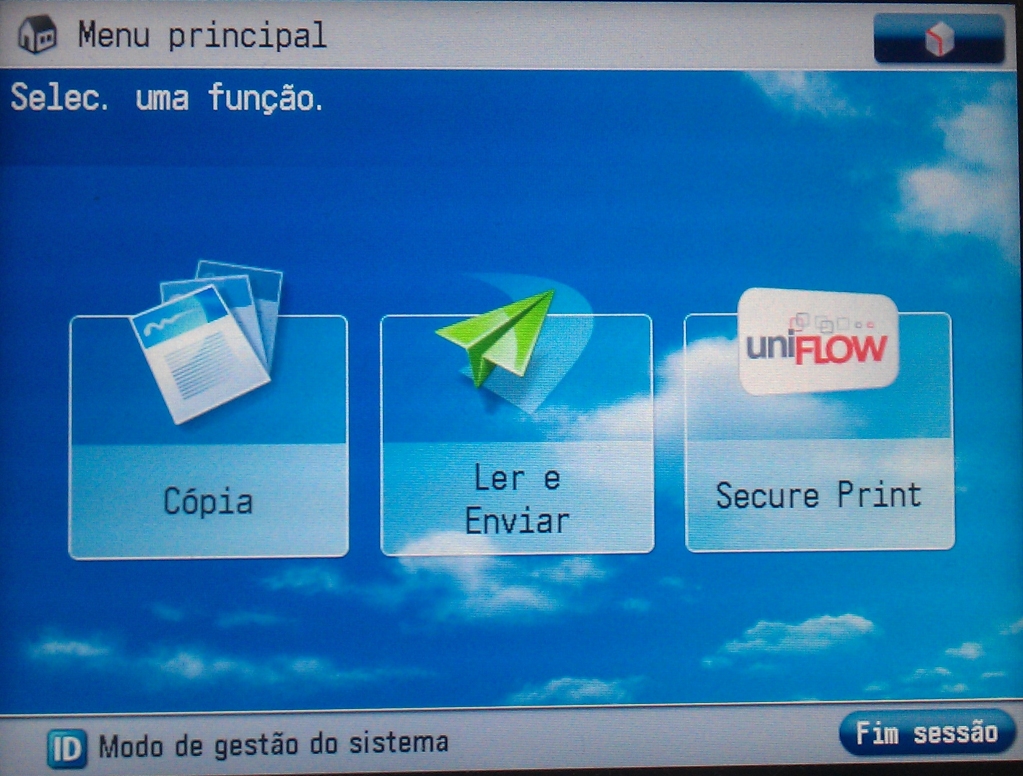
- You are presented with the next menu where you choose what you want to do with the printer. From this point on, the options and menus are the same as for the rest of the FCUL printing system, as explained above.
Solving Common Problems
- Paper has run out in all A4 drawers or in the A3 drawer.
If it is a business day, during the opening hours of the Computer Services Department (for the Student Area equipment) or during the opening hours of the Library (for the equipment at the Central Library) please request replacement at the respective location. Outside office hours (or weekend or holiday) please go to the security guards in building C5. For the rest of the equipment, contact the responsible offices where the printers are. - Equipment jammed! How to clear paper jams?
Inspect all areas indicated on the touch panel display and remove the jammed paper. To find out how to find and remove jammed paper, follow the instructions on the touch panel display. If the jammed paper tears while you are pulling it out, remove all torn pieces of paper from the Machine. IMPORTANT : If you turn off the machine with a paper jam, the machine may not be able to detect paper jammed in the drawers when you turn it back on. Therefore, remove the jammed paper without turning off the machine. - What do I do if I lose my card?
You must inform, as soon as possible, the service provided by Science Security Guards and/or the IT Services Department (in person, at the service desk or by email). - My card does not work in the printer
should digirir to the service of the Computer Services Directorate so that they can turn your card in the Science of Printing System. - My card gives an error and does not identify me with the Notary or the equipment
Please check in the option "Your Account Details" on the Personal Page of the Science Portal if in the "Science Card" tab there is a number in the "Technical ID" field . If you cannot log in to the site, the problem must be related to your account. Please go in person to the Customer 's Computer Services Department. Otherwise, please contact us via email suporte@ciencias.ulisboa.pt describing the situation. - Does "Noteiro" only accept notes?
Exactly, it is not possible to load coins or banknotes greater than 20€. - Other problem
Please send an email to suporte@ciencias.ulisboa.pt with the full description of the problem. Always indicate the equipment and username.
