CentOS 7 (Gnome)

Note: In order to configure an IKEv2 VPN, you must disable SELinux or configure a policy that allows VPN usage. SELinux configuration is beyond the scope of this manual, so the following configuration is based on the scenario where SELinux is disabled.

If you have SELinux enabled and wish to disable it, simply edit the /etc/selinux/config file and change the line from:

SELINUX=enforcing

to:

SELINUX=disabled

  1. Install the Epel repository - yum install epel-release.noarch

  2. Install the following packages and accept their dependencies: yum install NetworkManager-strongswan-gnome.x86_64 NetworkManager-strongswan.x86_64 strongswan-charon-nm.x86_64 strongswan.x86_64

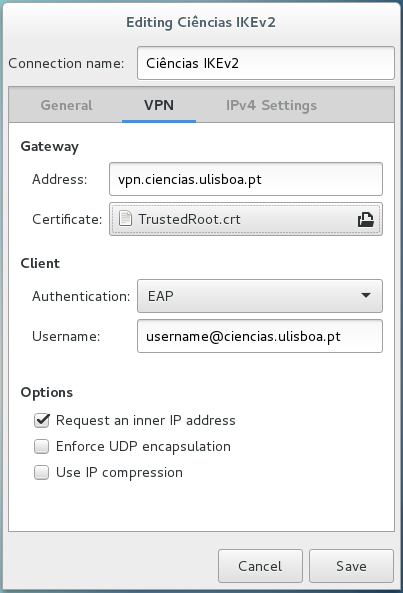
  3. Download the CA certificate from the following link and save it in a location of your choice: TrustedRoot

  4. Run the NetworkManager editor using the command: - nm-connection-editor

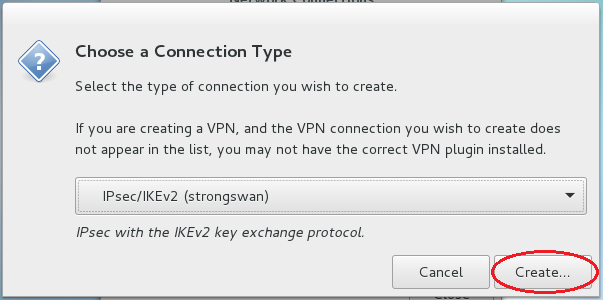
  5. In the window that appears, select Add

  1. Select IPsec/IKEv2 (strongswan) VPN type

  1. Click on the Create button

  1. Set the following parameters:

    a) Connection name: <your choice>

    b) Address: vpn.ciencias.ulisboa.pt

    c) Certificate: <navigate to the location where the certificate was saved and select it>

    d) Authentication. EAP

    e) Username: <your email address>

    Note: students should use a username of the type username@alunos.ciencias.ulisboa.pt

    f) select: Request an inner IP address

  1. Finish the configuration by clicking the close button and restart the operating system.

  1. To start or end the VPN session, simply access the menu bar in the top right corner and expand the VPN section.

  1. Enter your password when requested

  1. If the operating system key manager requests a new password for the connection, simply enter one of your choice.

Announcements

Welcome to the new CIÊNCIAS ULisboa website